Tuesday, August 16, 2011

Barnacles - Frame Modifications For New Site


After approval by the cities engineer, we began adding extensions to the rear of the frames that will used to anchor the sculpture to the parking garage structure. As shown in renderings in an earlier post, the sculpture is mounted over a long horizontal opening on the 3rd floor of the parking garage. The above drawing shows construction and installation details for the new site.


The extensions or legs that are being added to the rear of the frames are constructed much like the rest of the frames. A spacer is welded inside the square tube to keep the tube from collapsing when the concrete anchors are tightened.


The frames that are smaller than the opening in the parking garage have three legs at the bottom with two concrete anchors per leg.


The frames that are larger than the opening have four legs. Two at the top and two at the bottom. These only use a single concrete anchor in each leg.


Detail photos showing triangular gussets that were added for strength. The piece of angle iron that is welded to the leg serves as positioning stop that will space the frames two inches off of the concrete wall.

Thursday, July 28, 2011

Barnacles - New Site Plans

After getting approval of the new location for Barnacles, the next step was to submit new site plans and engineering specifications to the city. For this we enlisted the help of Davison Architecture & Urban Design and Norton & Schmidt Consulting Engineers. As soon as the city engineer signs off on the revised site plans, we'll begin modifying the support structure of the spun steel pieces for the new location.


New site plan and engineering specifications submitted to the city.

Monday, February 21, 2011

Barnacles - New Location

We're back on track with Barnacles, but as I mentioned in the previous post, the location has been changed. The new location is the parking structure at 13th and Walnut, KCMO.

A rendering of the new location.

A view of the proposed installation from the inside of the parking structure

Friday, January 21, 2011

Barnacles - On Hold

It's hard to believe it's been a little over a year since I've updated this blog. Unfortunately "Barnacles" has been bogged down in bureaucracy. The original location has been changed, and we are hoping that in the near future we'll be able to resume work on Barnacles. The new location is quite different in terms of installation, and will require some redesign and modification to the existing support structures. While the delays have been discouraging, I am happy with the new location, and look forward to resuming this project.

Sunday, December 27, 2009

Barnacles - Bracket Welding


After getting the spun pieces back from the metal spinners, the next step was to weld a bracket inside of each spun piece. Eventually a piece of translucent blue acrylic will be bolted to the inside of the spun pieces. The steel brackets that are being welded in were laser cut by a local fabrication business.


To make sure the brackets are positioned correctly inside the spun pieces prior to welding, I've made a wooden block the correct height for each of the 5 sizes of barnacles.


The bracket is set on top of the block.


And then welded in place.


My original plan was to tig weld the brackets, but either tig or mig distorts the outside of the spun piece requiring touch up, so I've decided to mig weld these for the sake of speed.


A view of the welding blemish on the outside of a spun piece after the bracket has been welded in.


A flap sanding wheel works great for cleaning up the welding blemish.


Stacks of "Barnacles" ready to go to the powder coater.

Wednesday, September 9, 2009

Barnacles - Metal Spinning

As I had mentioned in an earlier post, we had been wanting to utilize a local metal spinning business in one of our projects. United Metal Spinning Co. was founded in 1929 and is now a 4th generation family owned business. As somebody who enjoys turning, United Metal Spinning is a fascinating place. Their equipment runs the gamut from 100+ year old spinning lathes to the latest cnc technology. They are also ultra nice people to work with. If you have a project that requires spun metal, I would encourage you to contact them. http://umspinkc.com/


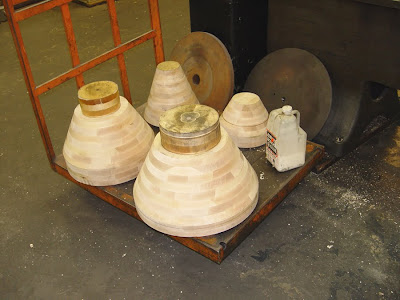
The first step in metal spinning is to create a mold for the metal to be spun over. These are 4 of the maple blanks that will become molds for the spun Barnacles shapes.


This shows one of the maple blanks attached to the lathe.


Larry Brennaman (a forth generation metal spinner) works on the maple blanks that will become the molds for "Barnacles".


When a mold is finished, it is then fastened to the headstock of a spinning lathe. Then a flat sheet of steel that has been cut into a circle with a registration hole in the center is attached to the tailstock side. The wood mold has a steel pin that holds the sheet in registration by means of pressure applied by the tailstock of the lathe. Once the flat sheet is secured, the spinning can begin.


Detail showing how a flat disc of steel is spun over a wooden mold. This is a pretty simple shape to spin. More complicated shapes may use multi part molds that can be disassembled and removed from the final spun shape. Also for very high production runs, a steel mold may be utilized.


One of United Metal Spinnings craftsmen working on the 18" diameter "Barnacles". Tools for metal spinning are much larger and heavier than their wood turning counterparts. A tremendous amount of leverage or pressure is required to form the steel. You can see this spinning tool has a steel roller on the end. For smaller thinner materials a spinning tool may just have a rounded blunt end and be held freehand.


Another view of one of United Metal Spinnings craftsmen working on the 18" diameter "Barnacles"


The metal almost looks flood in this shot.


Spinning is finished. All that's left is to trim the nose off with a parting tool.


Stacks of "Barnacles"

Tuesday, September 8, 2009

Barnacles - Frame Fabrication

This post shows some of the steps involved in the fabrication of the framework that supports the spun steel pieces of Barnacles. Barnacles is composed of sixteen frames that are each about 5 feet wide. Each frame is unique.


Rear views of Barnacles


This shows a construction drawing and cut list for two of the sixteen sections of Barnacles.


Raw material: 1.5" square tube and .75 OD x .375 ID round DOM tube.


The first step in the fabrication of the frames is cutting the square tube to the correct lengths and angles. Most of the cuts are 90 degree cuts, but there is an occasional 45.


These are the cut to length parts for one of the sixteen 5' wide sections of frame that comprise Barnacles.


After all the pieces of a frame have been cut, I lay them out on the welding table and plot the location of all the holes and where the welds will be.


Next, drilling holes on the mill


Now that all the holes have been drilled, I'll begin the next step which is adding an internal spacer that will strengthen the square tube when the spun steel pieces are fastened to the frame.


To facilitate welding the spacers inside the square tube, a keyhole slot is milled.


The spacers are inserted into the square tube and held in registration with a brass pin. Then a small tack weld is made in the slot.


Welding spacers


View showing spacers that have been welded inside the square tube


Sometimes a hole falls on a mitered corner. In that circumstance, the spacer is welded into one side of the miter, and then the two mitered cuts are welded together.


Detail showing a spacer welded into half of a mitered cut


After the spacers have been welded inside the square tube, the bulk of the weld is removed on the belt sander.


Now that the bulk of the weld has been ground off on the belt sander, I'll finish this off with a different grinder.


The final grinding is done with a small right angle air grinder.


The weld that holds the spacer in place is ground out flat which still leaves just a little bit of weld obscuring the hole.


The last step with the spacers is cleaning out the hole with an end mill.


Now that the spacers have been completed, I'm ready to begin welding the frame together.


Generally a frame has many short pieces that are welded to longer pieces at 90 degree angles, so I begin by welding all the short pieces first.


And then I start welding together the smaller sections into larger sections.


And then those sections are assembled and welded into the final configuration.


After all the sections have been welded together, the welds are ground out flat.


The frame is about 80% done at this point. Next, we'll do a test fit of the spun steel pieces before the final structural elements are added, and it's sent to the powder coater.